

Add and manage website widgets and popups (On-Site Displays)
On-Site Displays, On-site Displays, webext, website widget, chat widget, WhatsApp widget, rewards widget, popup, install widget, app embed, StudioOn-Site Displays is where you add BusinessOnBot widgets to your website, check they’re working, and change how they look. To open it, click On-site Displays in the left menu.
It has two tabs:
- Widgets: the WhatsApp, chat and rewards widgets on your site.
- Popup: the popup that collects visitors’ phone numbers and emails.
Widgets
Section titled “Widgets”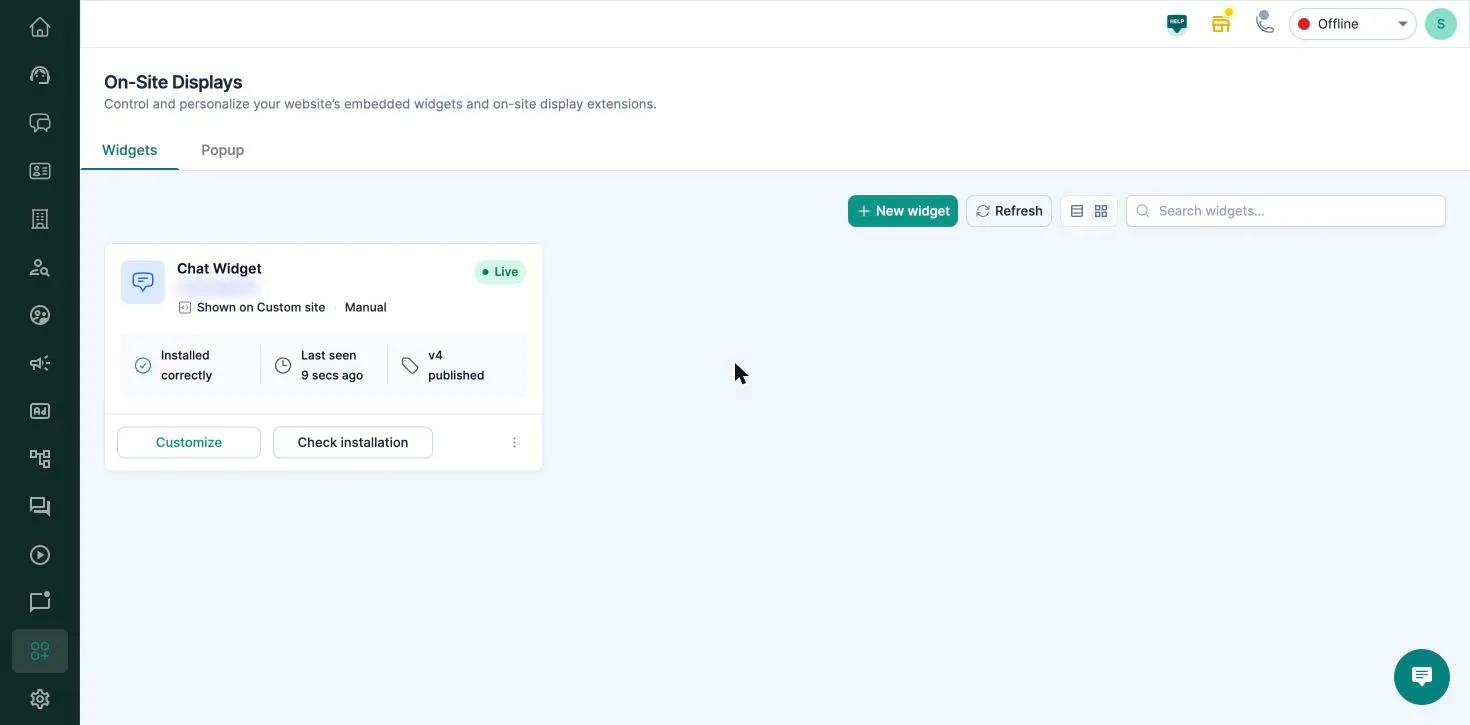
Each widget card shows:
- Shown on: your website platform (Shopify, WooCommerce or Custom site) and how the widget is installed (app embed, script or manual).
- Status: for example Live, Install required, Config required, Not recently active (not seen on your site for 24 hours) or Needs attention. Widgets that need you appear first.
- Installed correctly, Last seen (when the widget was last detected on your site) and the published version.
Add a widget
Section titled “Add a widget”-
Click New widget.
-
Choose the widget:
- WhatsApp Widget: lets customers message you on WhatsApp.
- Rewards Widget: shows rewards and referral offers on your site.
- Chat Widget: a real-time chat window on your website.
You can have one of each.
-
Choose where your website is hosted: Shopify, WooCommerce or Custom website. Shopify and WooCommerce are available when your store is connected.
-
Enter a Widget name so you can recognise it. For WhatsApp and Rewards widgets, pick the WhatsApp account that will receive the messages.
-
Check the summary and click Create widget.
Then finish the installation:
- Shopify (recommended: app embed). If the app embed isn’t on yet, you’ll see Enable Shopify app embed. Click Open Shopify theme editor, turn on the BusinessOnBot app embed, then click I’ve enabled it, check again. You can choose Use script tag instead if you prefer.
- Custom website. Click Copy script and paste it into your site just before the closing
</body>tag. Or click Send to developer to email it. Then click I’ve installed the script, check now.
You can close the window and continue later. The card shows Continue setup until it’s done.
Check that a widget is installed
Section titled “Check that a widget is installed”Click Check installation on the widget card. You’ll see one of:
- Installation successful: the widget is live.
- Installation not detected: the script isn’t on your site yet. Add it before
</body>and click Check again. - Setup failed: click Retry setup. If it still fails, click Check connection to email our support team.
Customise a widget
Section titled “Customise a widget”Click Customize on the card. This opens Studio, with a live preview (switch between desktop and mobile at the top).
| Setting | What you can change |
|---|---|
| Colors | Primary colour, text colours and background |
| Placement | Bottom left or bottom right, and the gap from the side and bottom, separately for desktop and mobile |
| Visibility | Show on desktop, mobile or both, and on all pages or only specific pages (page rules: equals, not equals, matches) |
| Custom Css | Your own CSS, for advanced styling |
Each widget type has its own settings too. For example, the WhatsApp widget’s store name, message and tooltip; the chat widget’s greeting callout, FAQs, contact options and logo; and the rewards widget’s earn, redeem and referral options.
Click Save as Draft to keep your changes without showing them, or Publish to update the widget on your website.
Other actions
Section titled “Other actions”Click ⋮ on a card to:
- Get script / SDK: copy the widget’s script, or open the JavaScript SDK docs.
- Deactivate: stop the widget showing on your site.
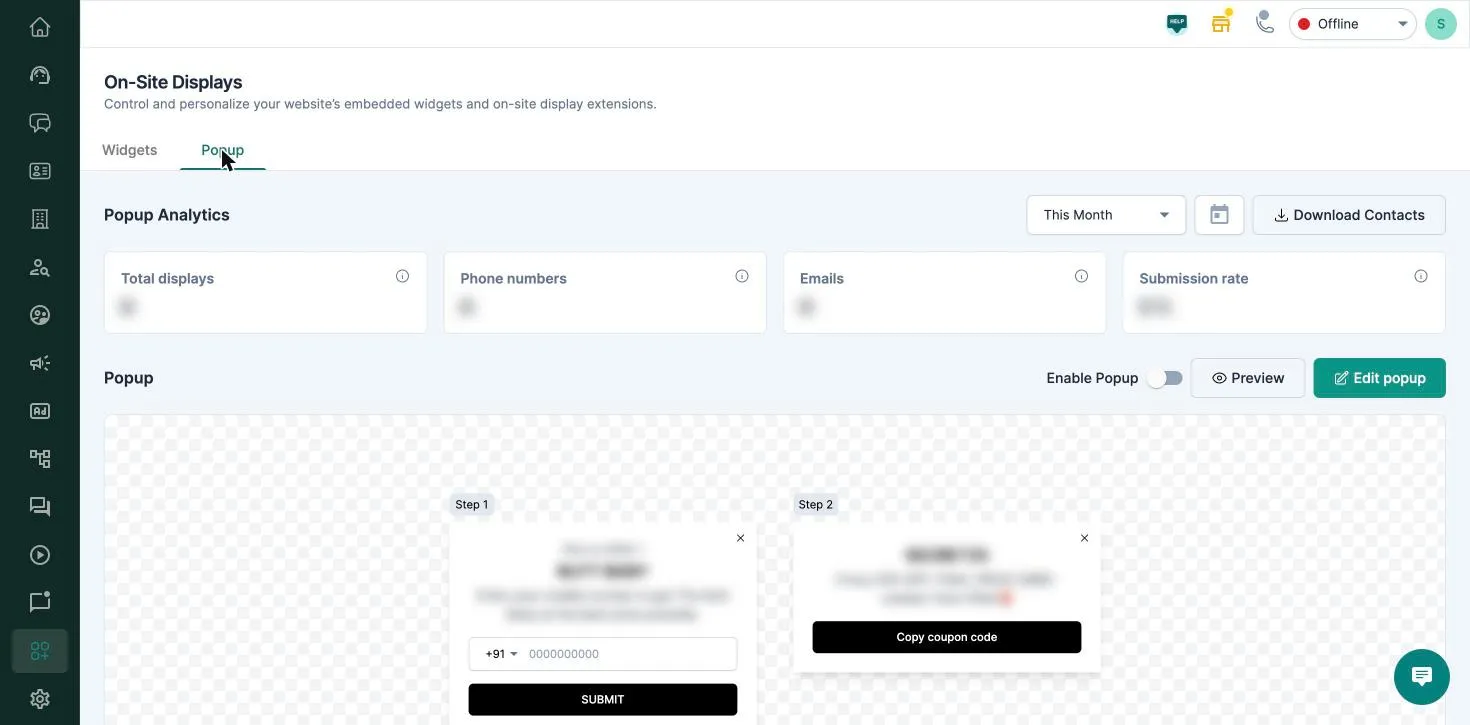
The popup asks visitors for their phone number or email (step 1), then shows them a coupon code or thank-you message (step 2).
Popup results
Section titled “Popup results”Popup Analytics shows, for the date range you pick:
| Metric | What it counts |
|---|---|
| Total displays | How many times the popup was shown |
| Phone numbers | Phone numbers collected |
| Emails | Emails collected |
| Submission rate | New form submissions ÷ views × 100 |
Click Download Contacts to download the phone numbers and emails collected in that range.
Set up the popup
Section titled “Set up the popup”-
Click Edit popup.
-
Choose the Popup type: Coupon code popup or Subscriber/Waitlist.
-
Set your Brand primary color, the Audience (all visitors, or only new visitors) and Display popup after (how many minutes and seconds after the visitor arrives).
-
On Edit step 1, choose an image layout and upload an image (JPEG or PNG, up to 5 MB, 16:9 suggested). Write the heading (up to 20 characters) and description (up to 120), and choose what to collect: phone number, email or both.
-
On Edit step 2, write what visitors see after they submit. For a coupon popup, add the Coupon Code (up to 15 characters).
-
Click Preview to check it, then Save and Publish.
-
Turn on Enable Popup.
Related
Section titled “Related”Was this page helpful?
Thanks, this helps us improve this page.
Still stuck? Email support@businessonbot.com