

Trigger a smart automation from your own system (custom webhook)
Smart Automation with Custom Webhook Event, custom webhook, webhook automation, API trigger, third-party trigger, payloadWhen you finish, your website, app or a third-party tool can send an event to a BusinessOnBot webhook URL, and the customer in that event gets a WhatsApp message with the details you passed in.
Step 1: Name the automation and define the data
Section titled “Step 1: Name the automation and define the data”-
Go to Smart Automation and click Create Automation.
-
Enter an Automation Name and an Automation Description.
-
Under Choose Trigger Event, select Custom webhook.
-
Add the custom variables your system will send. Each one is either:
- Text: for example customer name, order ID or phone number.
- Link: a URL to use in a template’s call-to-action button, for example a tracking link.
-
Copy the payload shown on screen with the copy button. Your system must send data in exactly this format.
-
Click Next.
Step 2: Set the timing and the audience
Section titled “Step 2: Set the timing and the audience”-
Set the delay in Days, Hours and Minutes after the event arrives, for example 5 minutes.
-
Under Target customers, choose All Customers, or Custom customers to target a group.
-
If you chose Custom customers, choose ALL or ANY, set the primary condition to Custom webhook, and pick one of your variables as the secondary condition. For example, send only when the order ID or tracking link matches a value you set.
-
Click Next.
Step 3: Choose the message and deploy
Section titled “Step 3: Choose the message and deploy”-
Under Select message type, choose Template, or Flow to send a flow you built in Flow Builder.
-
Select the template and map its variables to the custom variables from step 1. For a call-to-action button, choose a Link variable, such as the tracking link.
-
Under Exit Condition, choose Yes or No. See Exclude customers with exit conditions.
-
Under Expiry Time, choose Custom Date and enter an end date and time, or Never to run the automation until you turn it off.
-
Click Deploy Automation.
Connect your system
Section titled “Connect your system”-
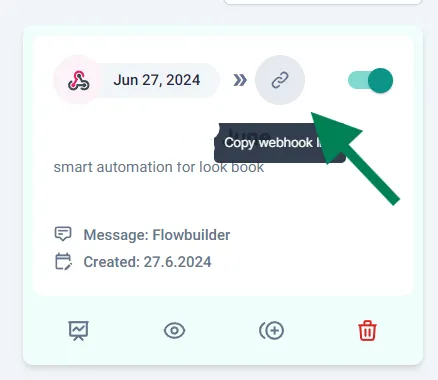
On the Smart Automation page, find your automation’s card and click the link icon (Copy webhook link).
-
Add this webhook URL to your website, app or third-party tool, so it sends the payload from step 1 whenever the event happens.
Watch the walkthrough
Section titled “Watch the walkthrough”Related
Section titled “Related”Was this page helpful?
Thanks, this helps us improve this page.
Still stuck? Email support@businessonbot.com